Giftpin
English
Install on Shopify

Pro guide Shopify store owners

Giftpin Pro
funds, gift cards and automation

Start Pro, set up group gifts and cash funds, sell gift cards on giftpin.app, send automatic emails and after-event discounts, run promotions, read analytics and use in-store mode. Bold text is exactly what you'll see on screen.

Do these steps in order. They are numbered 1 to 20 across the Setup, Customize and Pro pages, and the numbers carry on from one page to the next.

Pro

Optional extras for stores that want more.

12
Start Pro

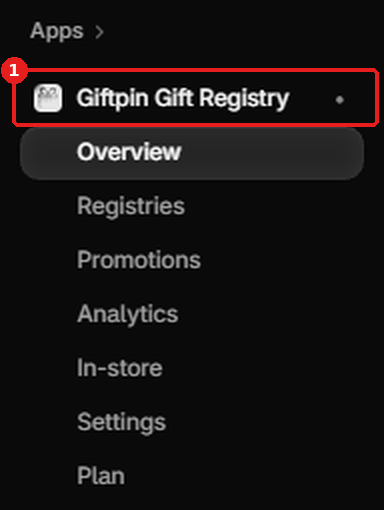
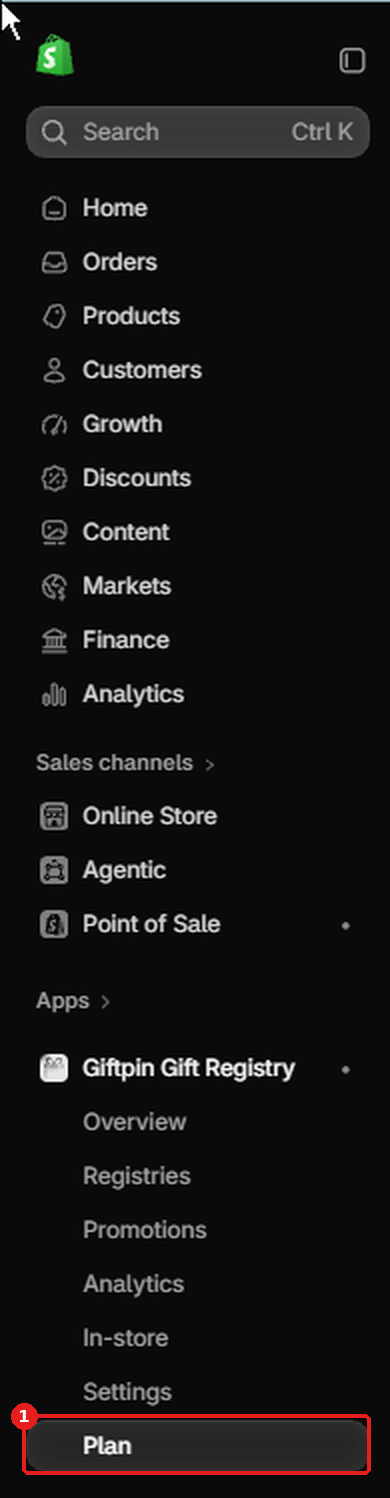
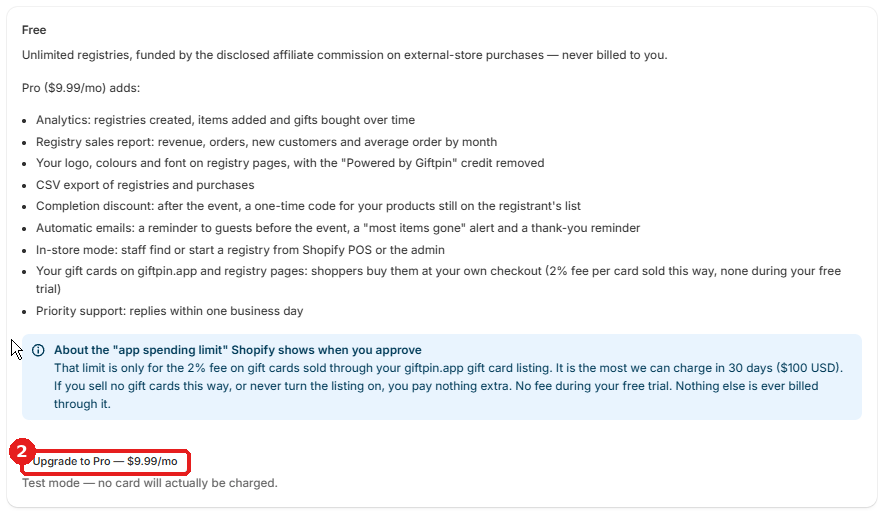
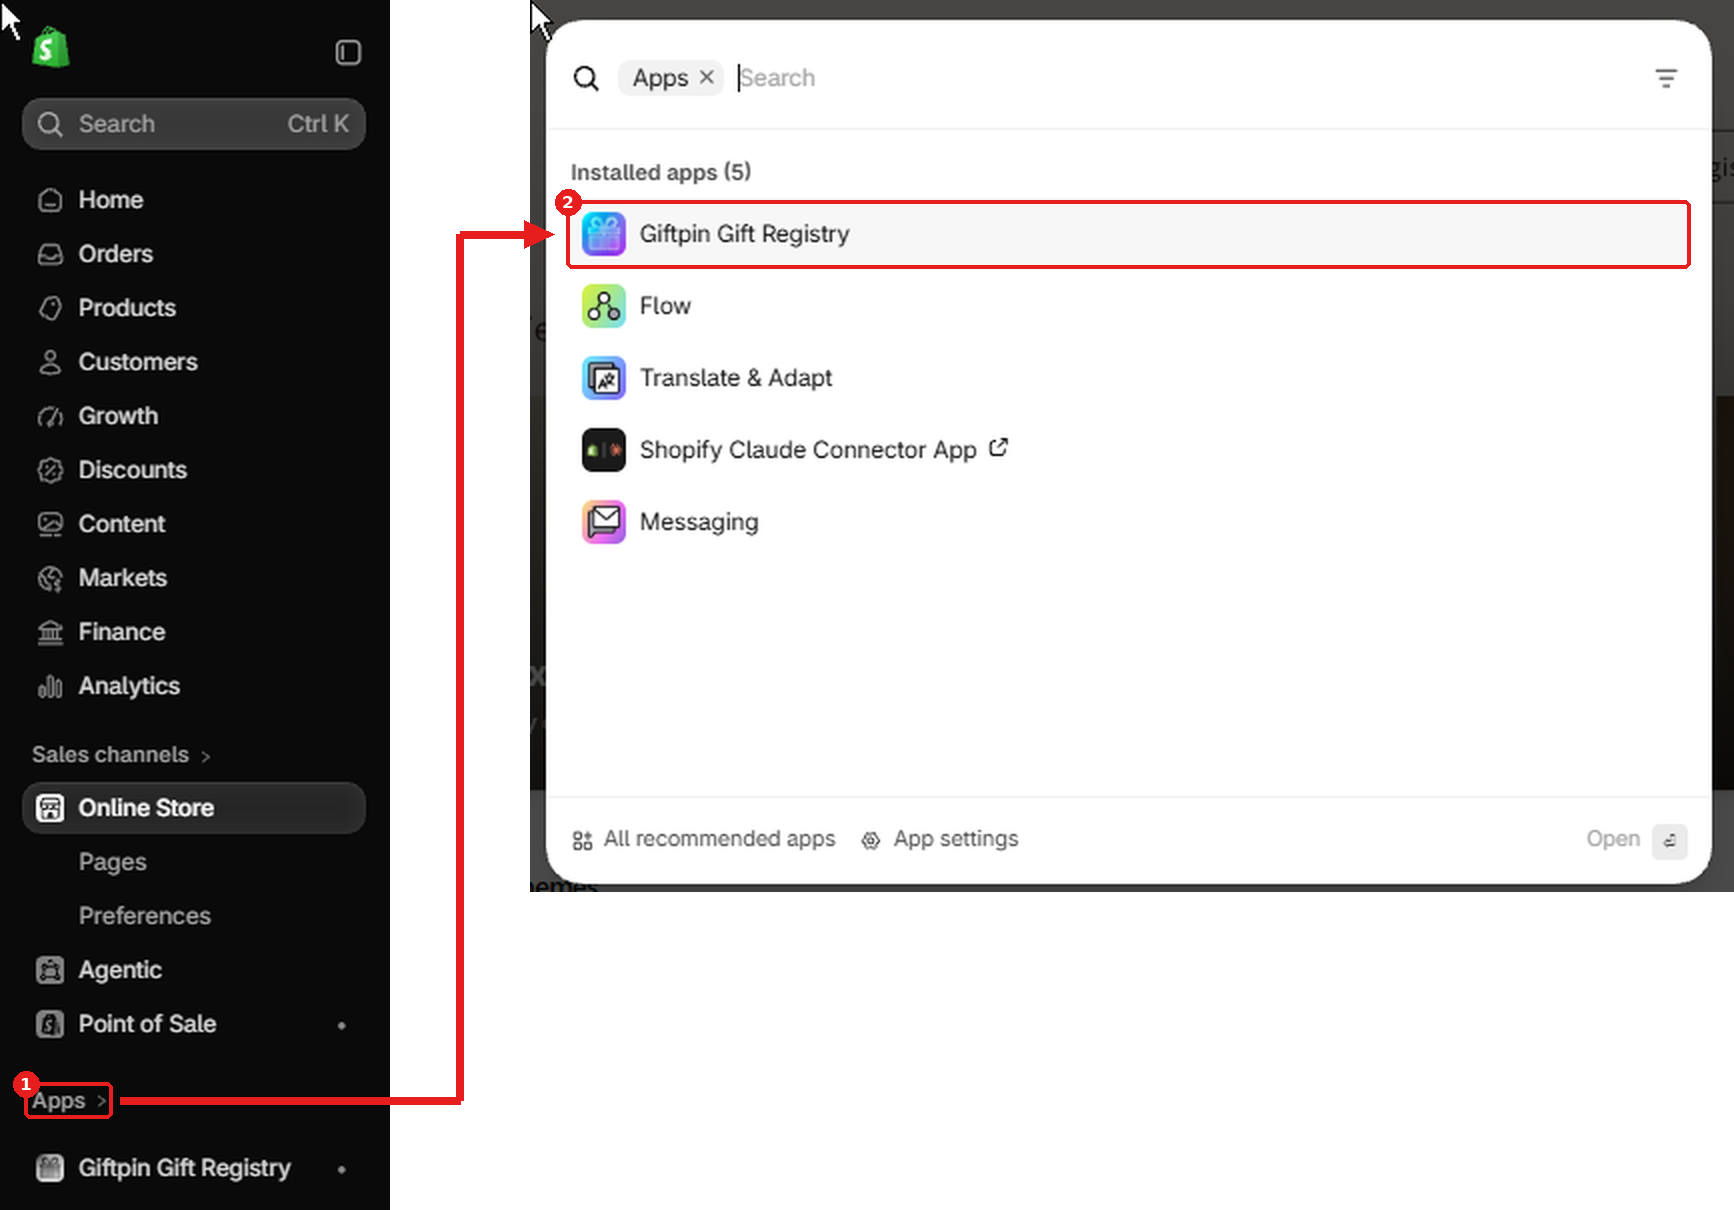
  1. Open Plan in Giftpin's menu and click the upgrade button. You get a 14-day free trial, then Giftpin Pro is $9.99/month. Cancel Pro is on the same page.
Shopify admin's left menu with Apps boxed in red and numbered 1, and an arrow to the Apps list where Giftpin Gift Registry is boxed and numbered 2Shopify admin's left menu with Giftpin Gift Registry, under Apps, boxed in red and numbered 1, and Giftpin's own menu open below it: Overview, Registries, Promotions, Analytics, In-store, Settings and PlanGiftpin's menu under Apps in the Shopify admin with Plan boxed in red and numbered 1The Plan page on the Free plan, listing what Pro adds, with the Upgrade to Pro button boxed in red and numbered 2The Plan page on Pro, showing the monthly price and the Cancel Pro button boxed in red
13

Offer registry perks (Pro)

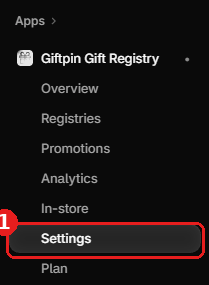
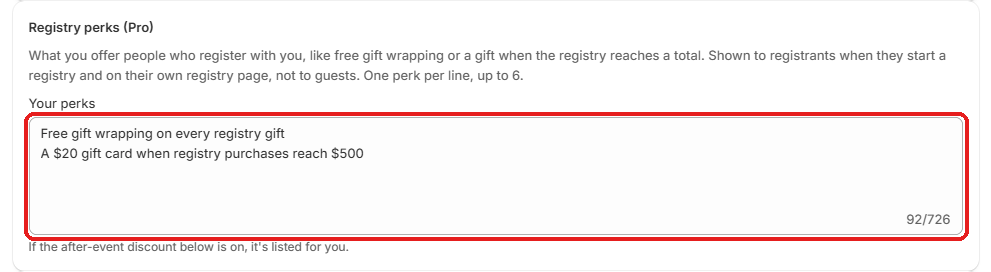
  1. Under Registry perks (Pro), write what you offer people who register with you, one per line, in Your perks: free gift wrapping, a gift when the registry reaches a total, and so on.
  2. Registrants see them while they create a registry. Press Save.
Shopify admin's left menu with Apps boxed in red and numbered 1, and an arrow to the Apps list where Giftpin Gift Registry is boxed and numbered 2Shopify admin's left menu with Giftpin Gift Registry, under Apps, boxed in red and numbered 1, and Giftpin's own menu open below it: Overview, Registries, Promotions, Analytics, In-store, Settings and PlanThe Giftpin menu in the Shopify admin with Settings boxed in red and numbered 1The Registry perks section of Settings with the Your perks box boxed in red, holding one perk per line
14

Group gifts and funds

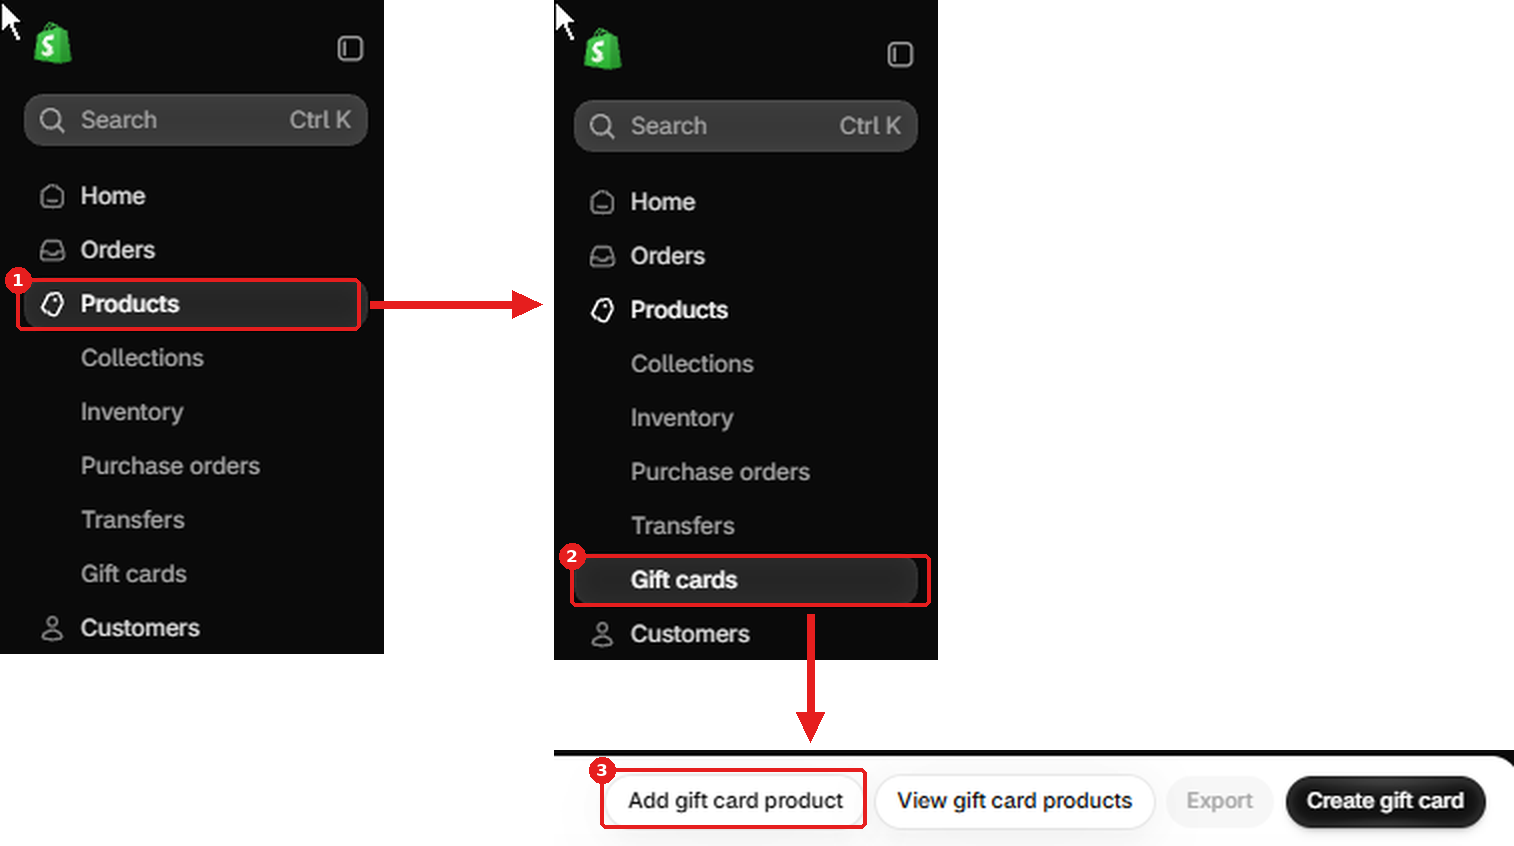
  1. In your Shopify admin, go to Products → Gift cards and click Add a gift card product.
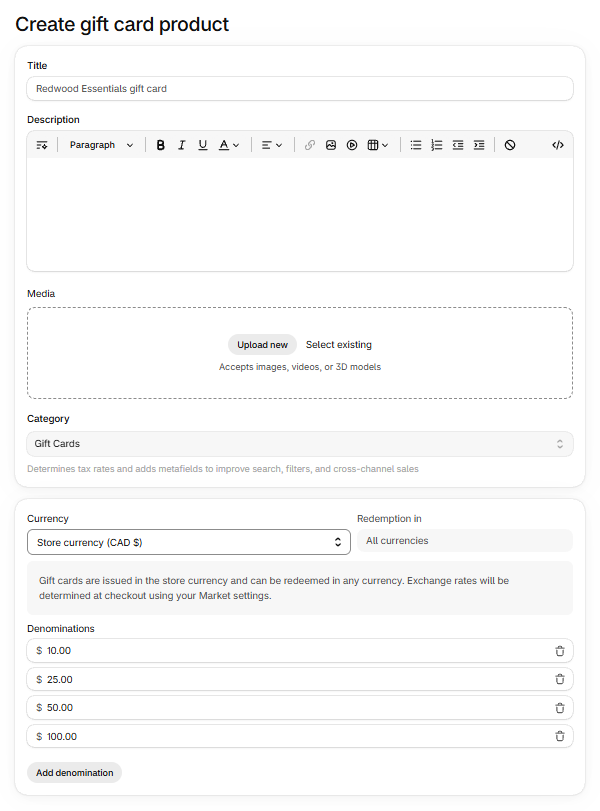
  2. Give it a title and a few denominations, such as 25, 50 and 100. To sell it on giftpin.app, at least one must be 500 or less, in your store's currency. Leave Online Store ticked under Sales channels and apps and click Save gift card product.
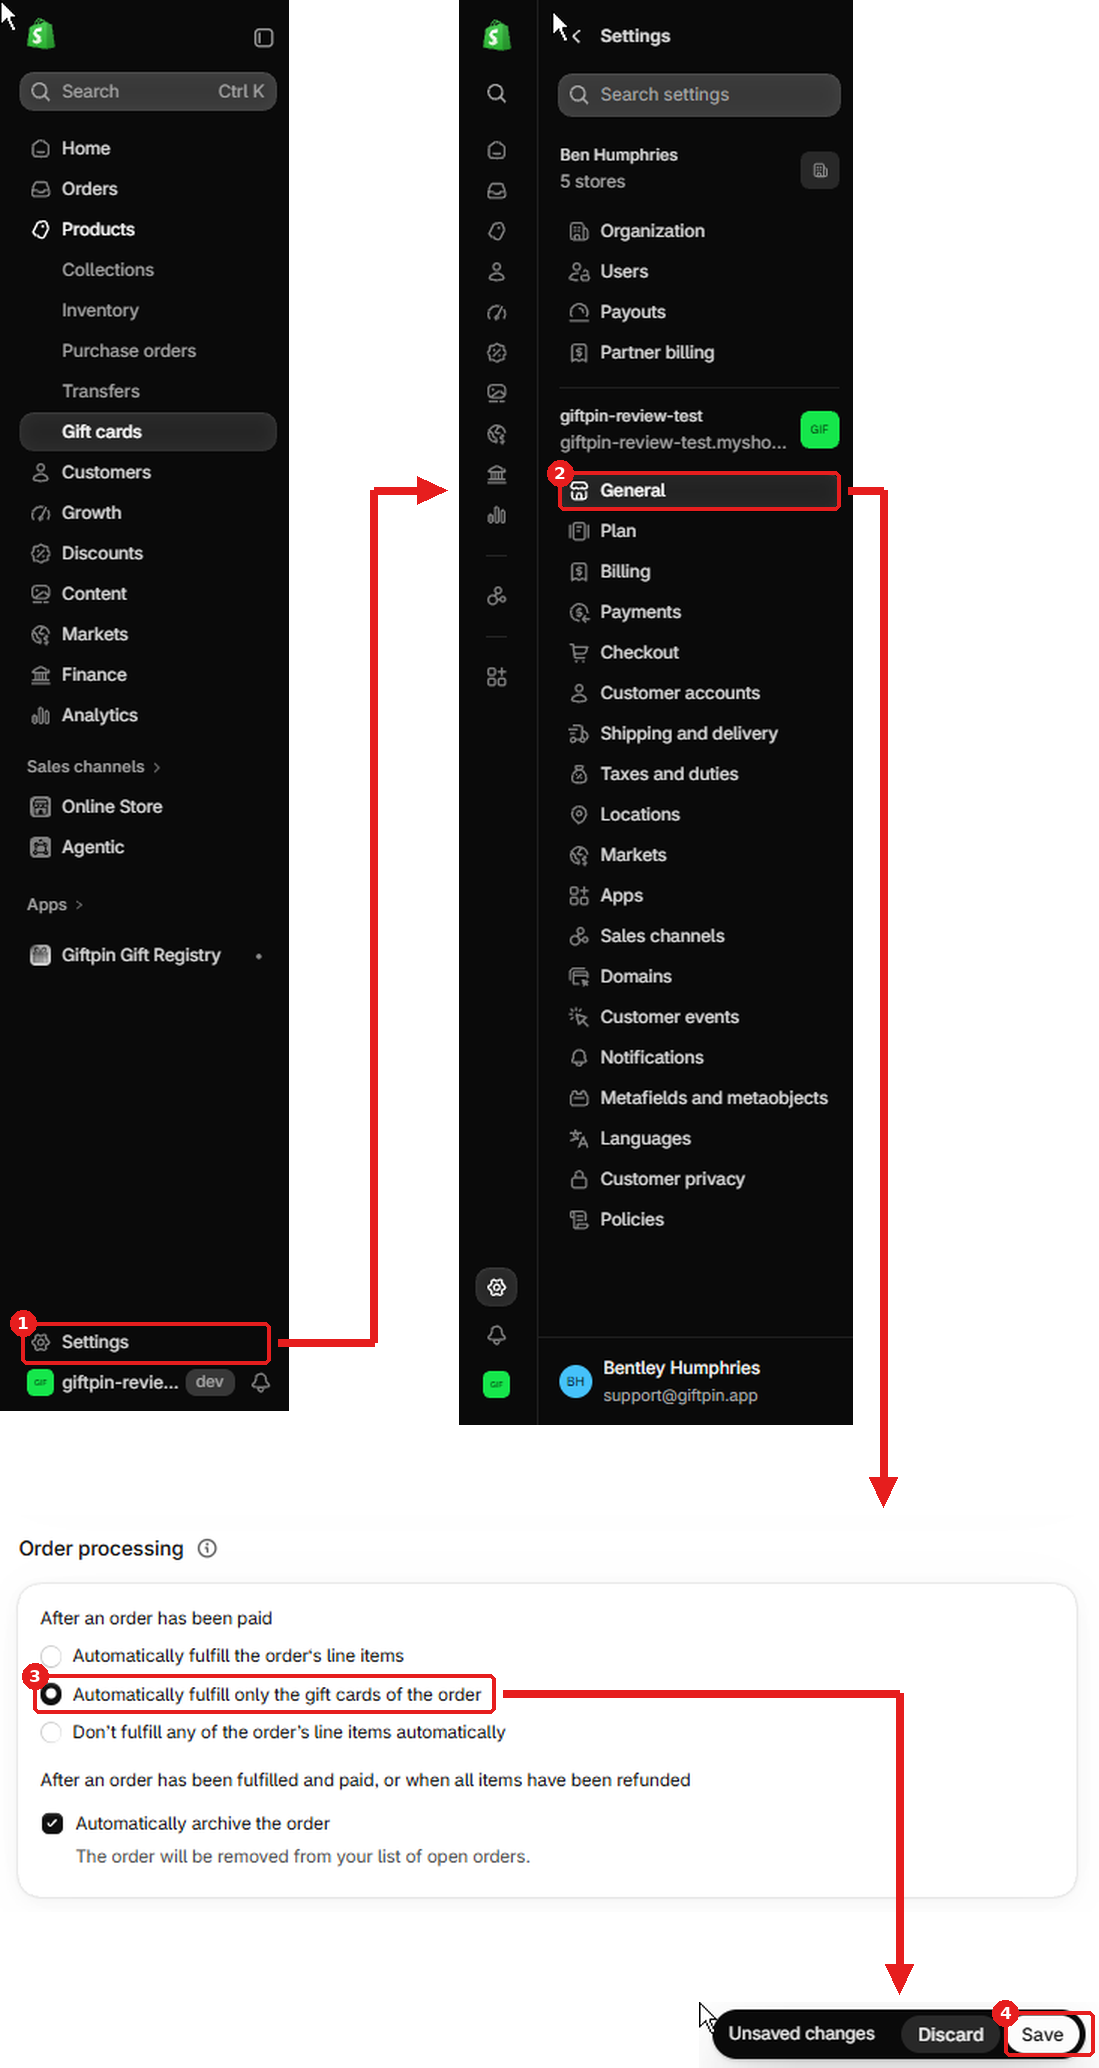
  3. In Settings → General → Order processing, choose Automatically fulfill only the gift cards. Shopify only sends a gift card once its order is fulfilled.
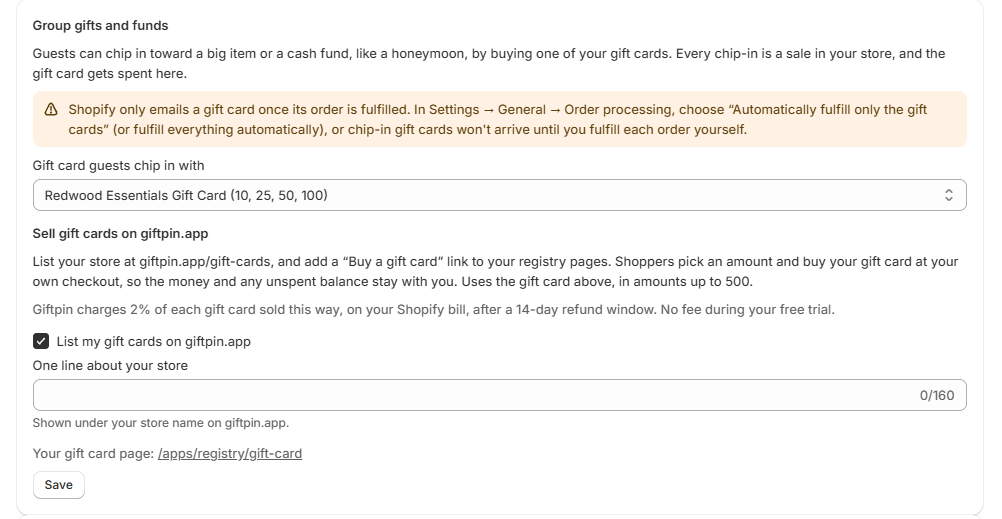
  4. In Giftpin, open Settings. If it was already open, reload the page so the new gift card shows up. Under Group gifts and funds, pick your gift card in Gift card guests chip in with and press that section's own Save.
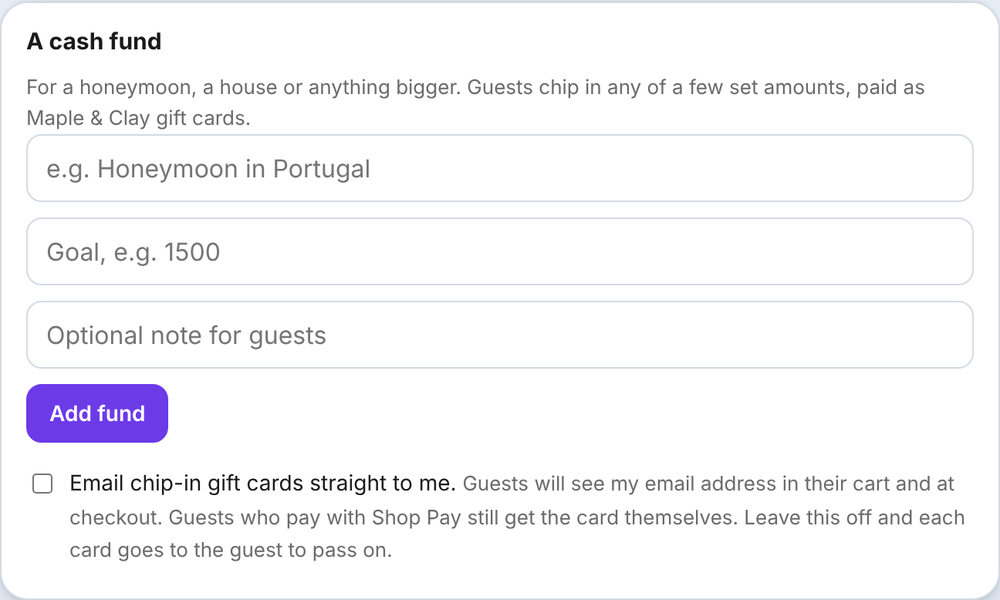
  5. Registrants can now add a cash fund on their manage page: under A cash fund, they give it a name and a goal and tap Add fund. Guests chip in with your gift card's amounts, toward a fund or a big item.
Shopify admin menus: Products boxed and numbered 1, an arrow to the Products submenu with Gift cards boxed and numbered 2, and an arrow down to the Gift cards page with the Add gift card product button boxed and numbered 3Shopify's Create gift card product page with the title Redwood Essentials gift card and denominations of 10, 25, 50 and 100Shopify admin: Settings boxed and numbered 1, an arrow to the Settings menu with General boxed and numbered 2, and an arrow to Order processing with Automatically fulfill only the gift cards of the order boxed and numbered 3, then the Save button boxed and numbered 4Giftpin Settings, Group gifts and funds, with a gift card picked under Gift card guests chip in with and List my gift cards on giftpin.app ticked

What registrants will see on their registry's manage page. This box won't open here; there is nothing to click.

The A cash fund box on a registry's manage page, with fund name, goal and note fields and the Add fund button
15

Sell gift cards on giftpin.app

  1. This needs Pro and the gift card from the step above, picked in Gift card guests chip in with. If that still says Off, your store isn't listed and Giftpin shows a warning when you save.
  2. In Giftpin, open Settings. Under Sell gift cards on giftpin.app, tick List my gift cards on giftpin.app, add One line about your store, and press that section's Save.
  3. Your store now appears at giftpin.app/gift-cards, under your country, and your registry pages get a Rather give a gift card? link. Shoppers buy your gift card at your own checkout, so you keep the money and any unspent balance. Gift cards sold this way show up in Giftpin's Analytics.
  4. Giftpin charges 2% of each gift card sold this way, on your Shopify bill, 14 days after the sale so a refunded card is never charged. There's no fee during your free trial.
Shopify admin's left menu with Apps boxed in red and numbered 1, and an arrow to the Apps list where Giftpin Gift Registry is boxed and numbered 2Shopify admin's left menu with Giftpin Gift Registry, under Apps, boxed in red and numbered 1, and Giftpin's own menu open below it: Overview, Registries, Promotions, Analytics, In-store, Settings and PlanThe Giftpin menu in the Shopify admin with Settings boxed in red and numbered 1

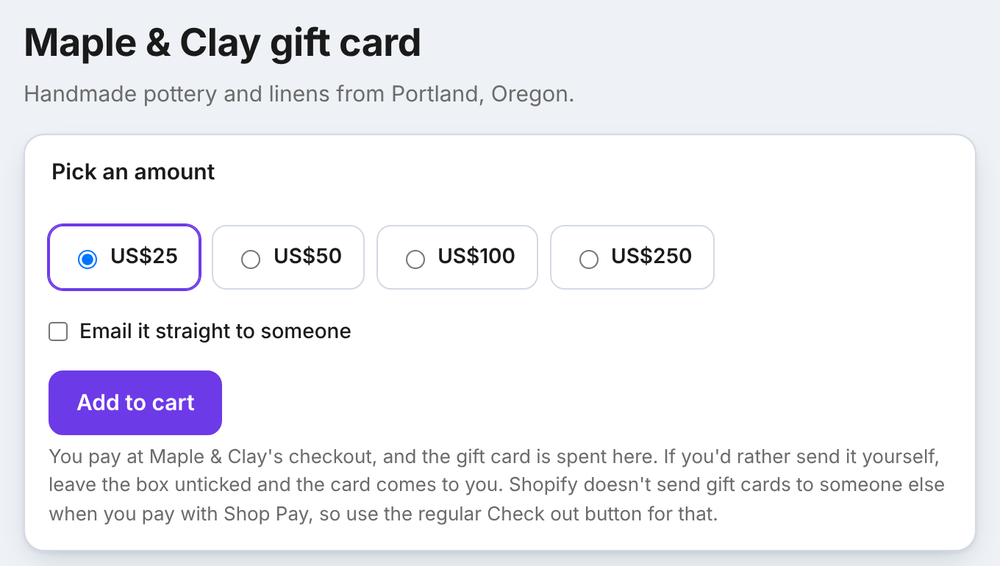
What shoppers will see on your store's gift card page.

A store's gift card page with amounts of $25, $50, $100 and $250, an Email it straight to someone box and Add to cart
16

After-event discount and automatic emails

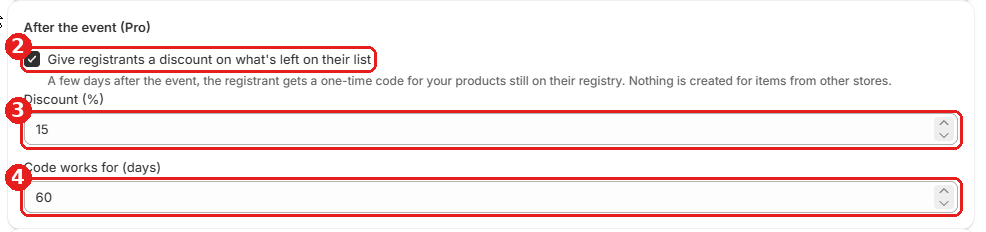
  1. Under After the event (Pro), turn on Give registrants a discount on what's left on their list, and set Discount (%) and Code works for (days).
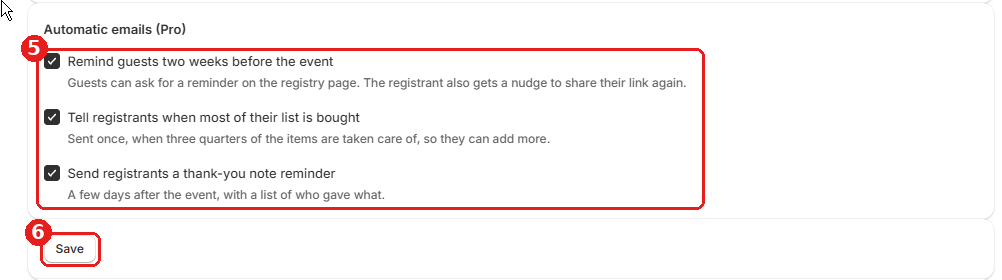
  2. Under Automatic emails (Pro), choose Remind guests two weeks before the event, Tell registrants when most of their list is bought and Send registrants a thank-you note reminder.
  3. Press Save (top right). To try them without waiting a day, use Run now at the bottom of Settings.
Shopify admin's left menu with Apps boxed in red and numbered 1, and an arrow to the Apps list where Giftpin Gift Registry is boxed and numbered 2Shopify admin's left menu with Giftpin Gift Registry, under Apps, boxed in red and numbered 1, and Giftpin's own menu open below it: Overview, Registries, Promotions, Analytics, In-store, Settings and PlanThe Giftpin menu in the Shopify admin with Settings boxed in red and numbered 1The After the event (Pro) section of Settings with the discount tick box and the Discount (%) and Code works for (days) fields boxed in red and numbered 2 to 4The Automatic emails (Pro) section of Settings with its three tick boxes boxed and numbered 5 and the Save button boxed and numbered 6The Run the after-event emails and discounts now card at the bottom of Settings, with the Run now button boxed in red and numbered 7
17

Registry promotions

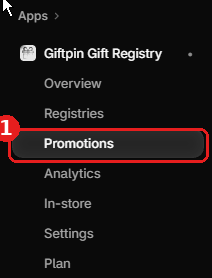
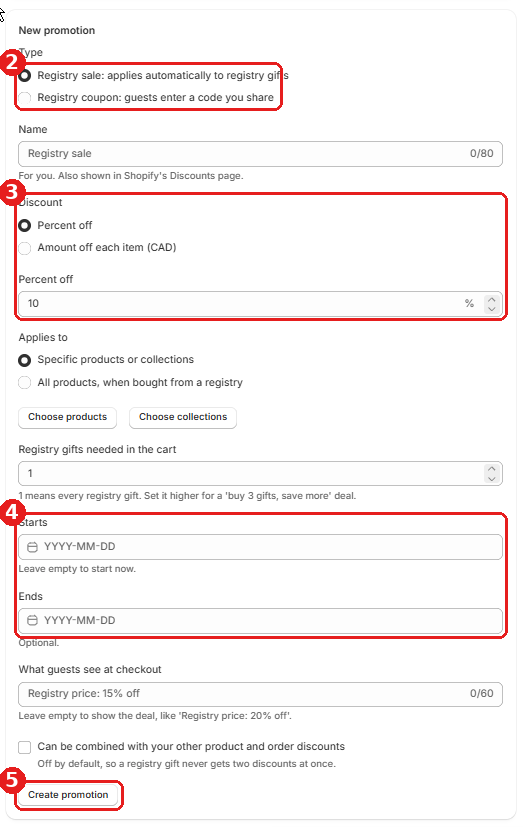
  1. Open Promotions. Under New promotion, choose Registry sale: applies automatically to registry gifts or Registry coupon: guests enter a code you share, set the discount and dates, and click Create promotion.
  2. A promotion only applies to gifts added to the cart from a registry page. The same product bought the usual way keeps its normal price.
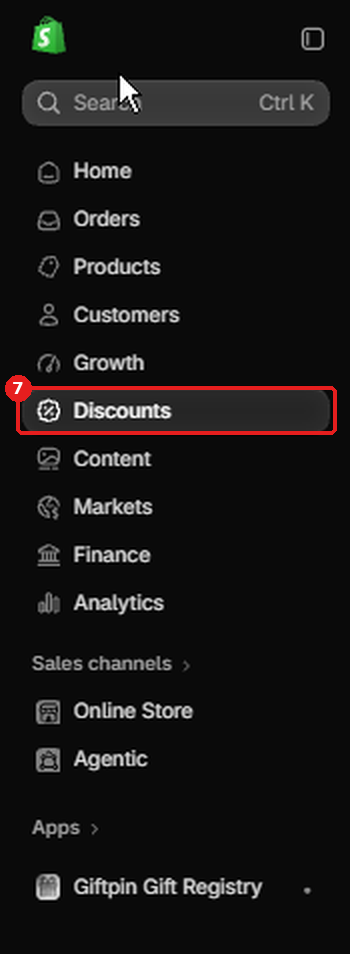
  3. Promotions also appear on Shopify's Discounts page, starting with “Giftpin:”.
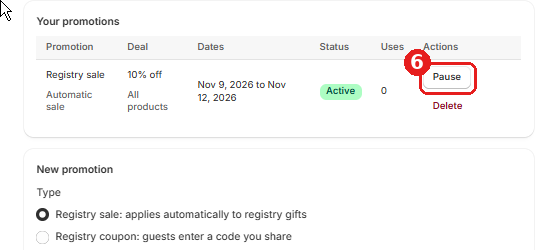
Shopify admin's left menu with Apps boxed in red and numbered 1, and an arrow to the Apps list where Giftpin Gift Registry is boxed and numbered 2Shopify admin's left menu with Giftpin Gift Registry, under Apps, boxed in red and numbered 1, and Giftpin's own menu open below it: Overview, Registries, Promotions, Analytics, In-store, Settings and PlanThe Giftpin menu in the Shopify admin with Promotions boxed in red and numbered 1The New promotion form with the type choice boxed and numbered 2, the discount boxed and numbered 3, the start and end dates boxed and numbered 4, and Create promotion boxed and numbered 5The Your promotions list, which sits above the New promotion form, with the Pause button boxed in red and numbered 6Shopify admin left menu with Discounts boxed in red and numbered 7Shopify's Discounts list with the Giftpin: Registry sale row boxed in red and numbered 8
18

Analytics and sales report

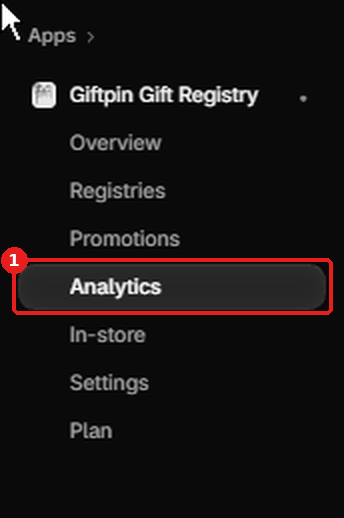
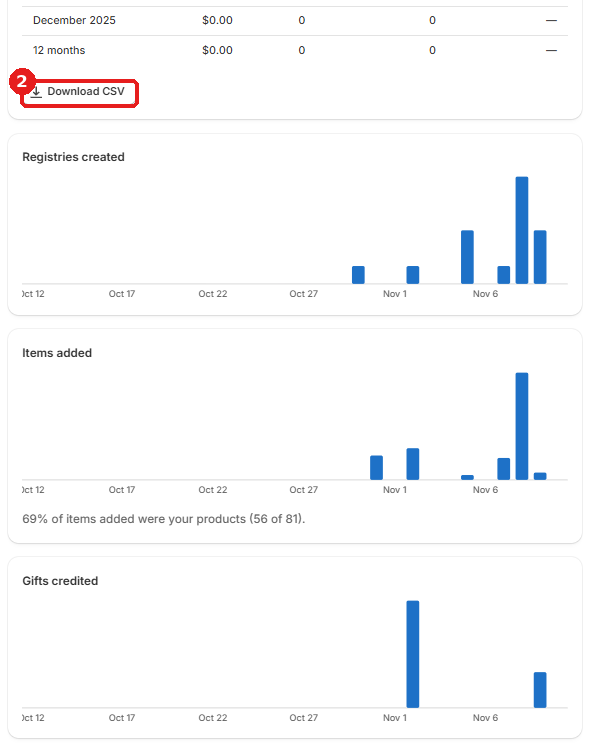
  1. Open Analytics for registries created, items added and gifts bought over time, where gifts were bought, and a month-by-month sales report. Download CSV exports the report.
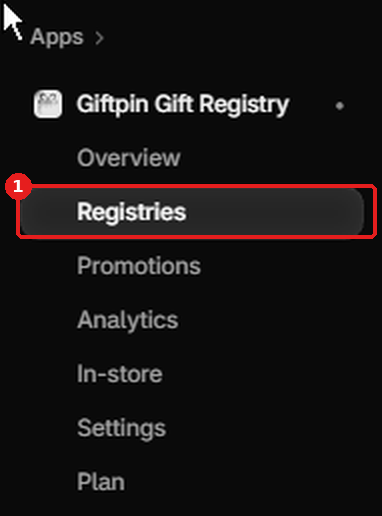
  2. Under Registries, Registries CSV and Purchases CSV export registries and purchases.
Shopify admin's left menu with Apps boxed in red and numbered 1, and an arrow to the Apps list where Giftpin Gift Registry is boxed and numbered 2Shopify admin's left menu with Giftpin Gift Registry, under Apps, boxed in red and numbered 1, and Giftpin's own menu open below it: Overview, Registries, Promotions, Analytics, In-store, Settings and PlanGiftpin's menu under Apps in the Shopify admin with Analytics boxed in red and numbered 1The Analytics charts (registries created, items added, gifts credited) with the Download CSV button boxed in red and numbered 2Shopify admin's left menu with Apps boxed in red and numbered 1, and an arrow to the Apps list where Giftpin Gift Registry is boxed and numbered 2Shopify admin's left menu with Giftpin Gift Registry, under Apps, boxed in red and numbered 1, and Giftpin's own menu open below it: Overview, Registries, Promotions, Analytics, In-store, Settings and PlanGiftpin's menu under Apps in the Shopify admin with Registries boxed in red and numbered 1The Export box at the bottom of the Registries page, with the Registries CSV button boxed and numbered 2 and the Purchases CSV button boxed and numbered 3
19

In-store mode and Shopify POS

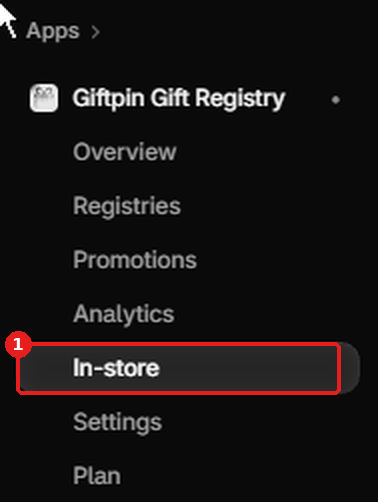
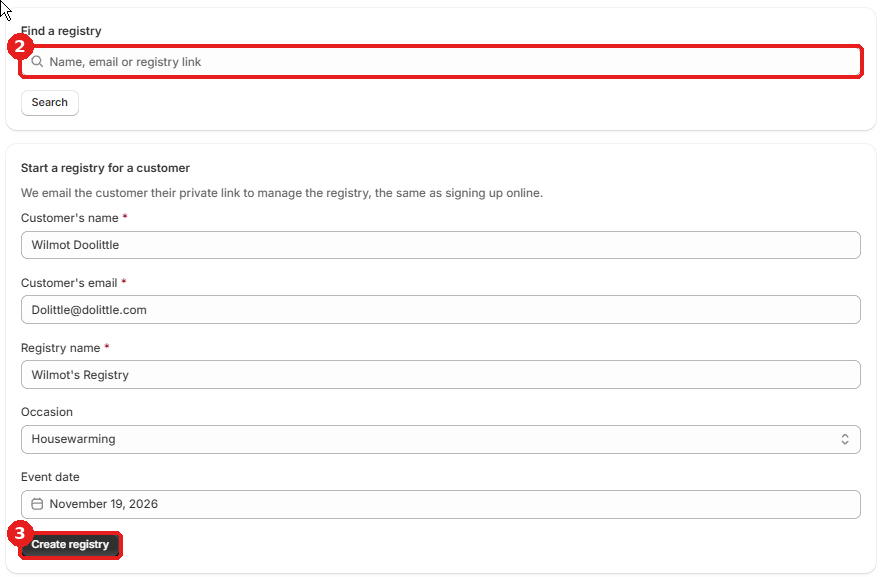
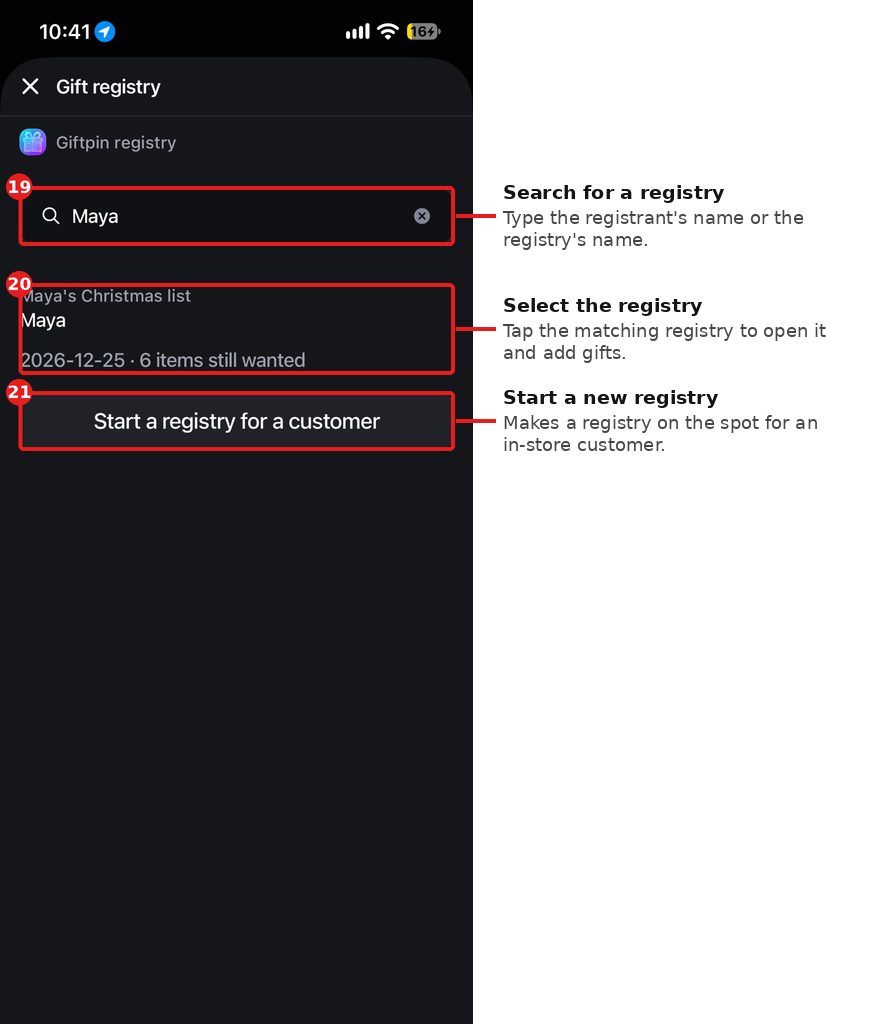
  1. Open In-store in Giftpin's menu to find a customer's registry or start one for them at the counter.
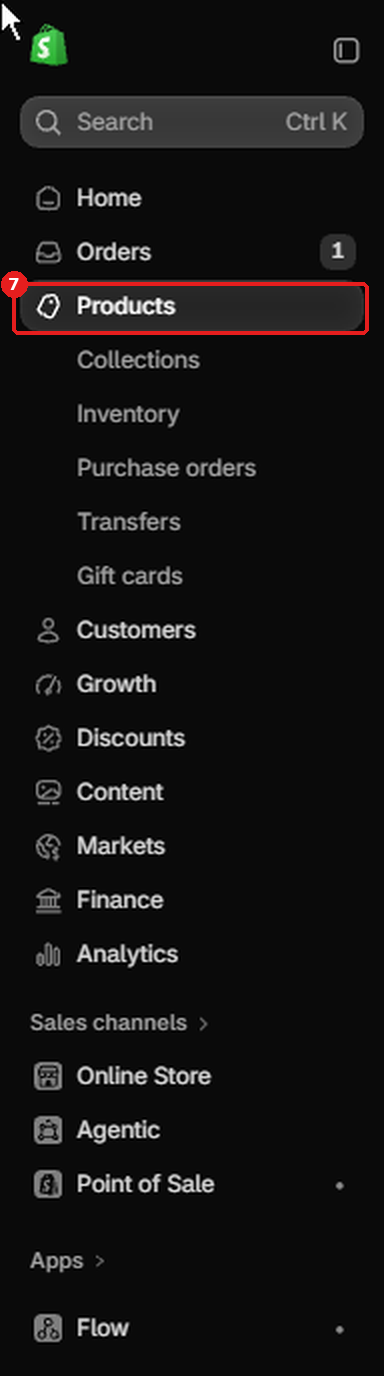
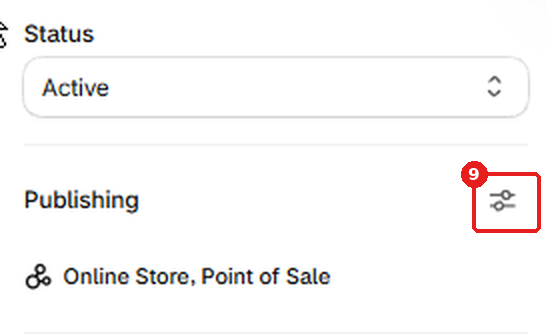
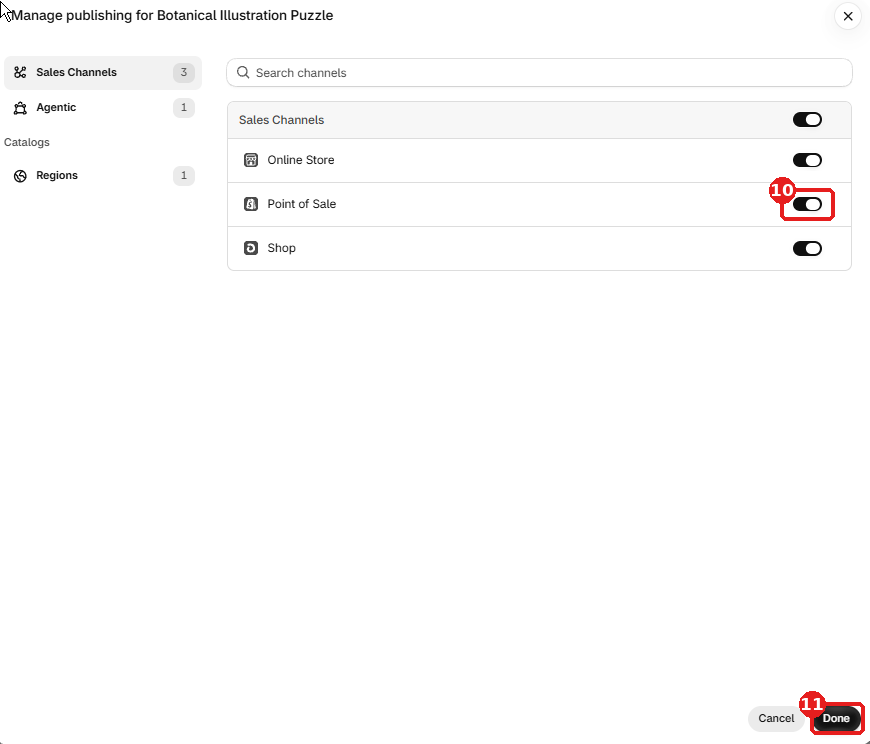
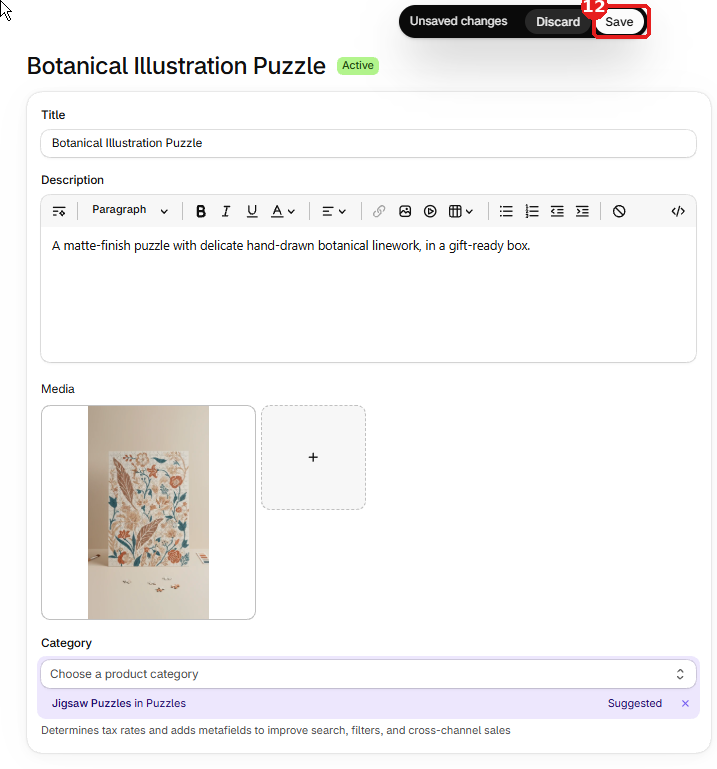
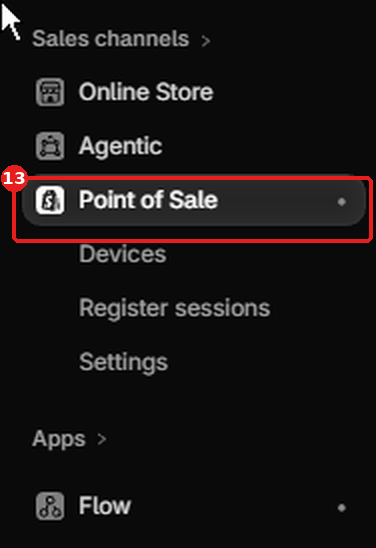
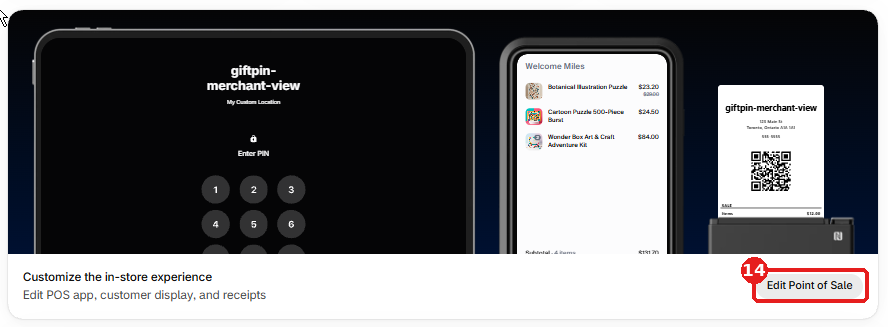
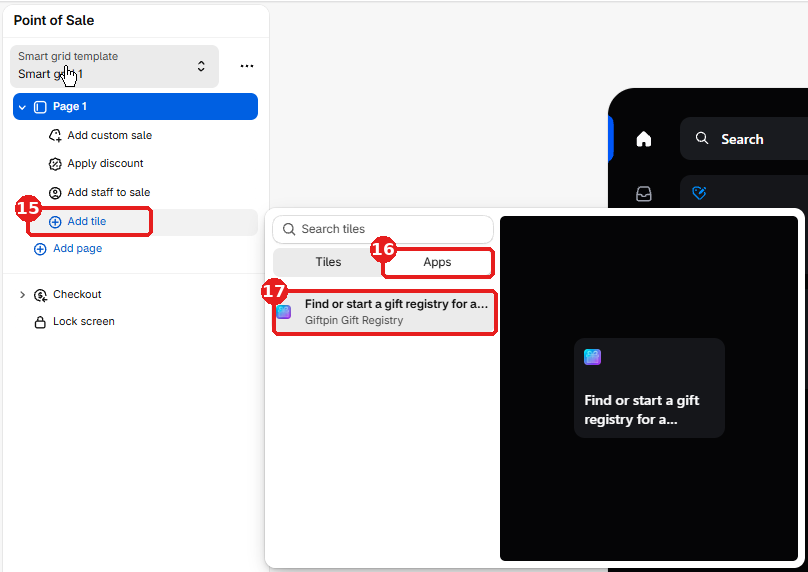
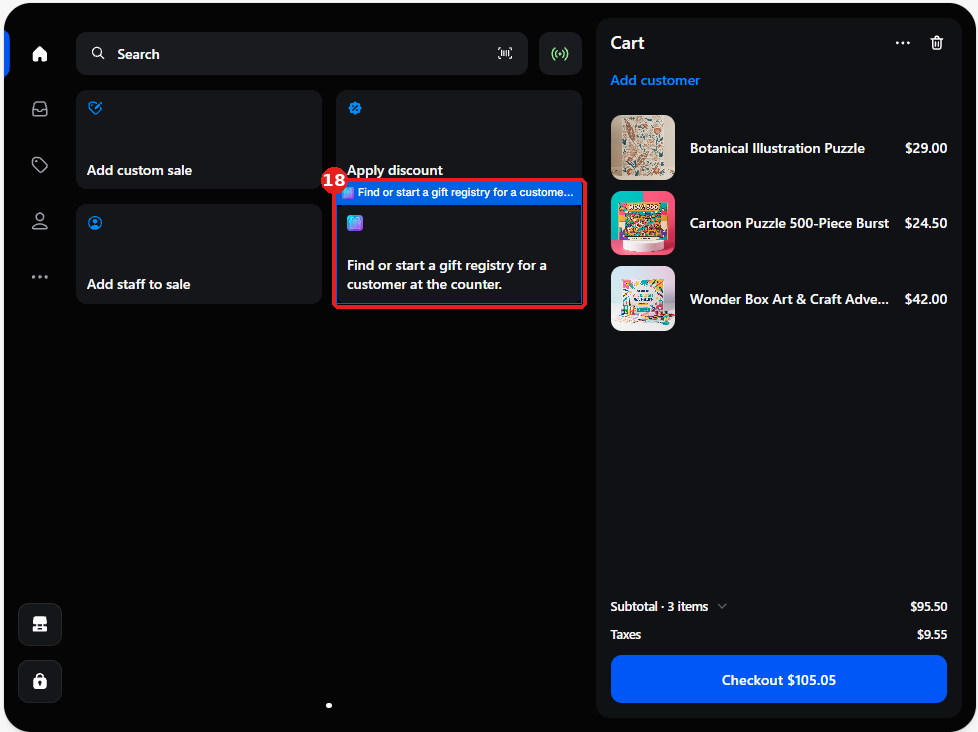
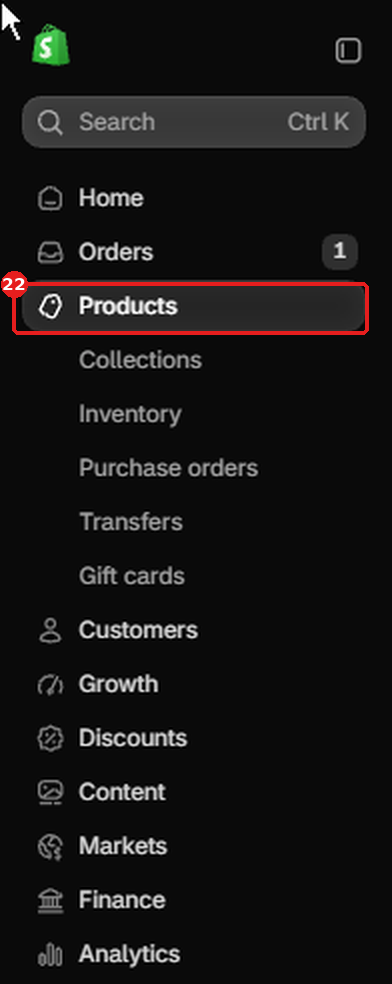
  2. To ring up registry gifts in Shopify POS, add the Giftpin tile: in your Shopify admin, open Point of Sale, then the POS editor, choose Add tile → Apps and pick Giftpin. Products must be published to the Point of Sale channel. Then click Save at the top right of the screen, or the tile won't appear.
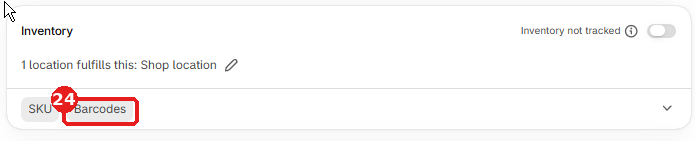
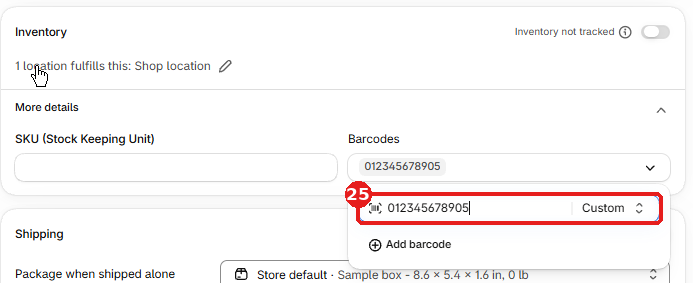
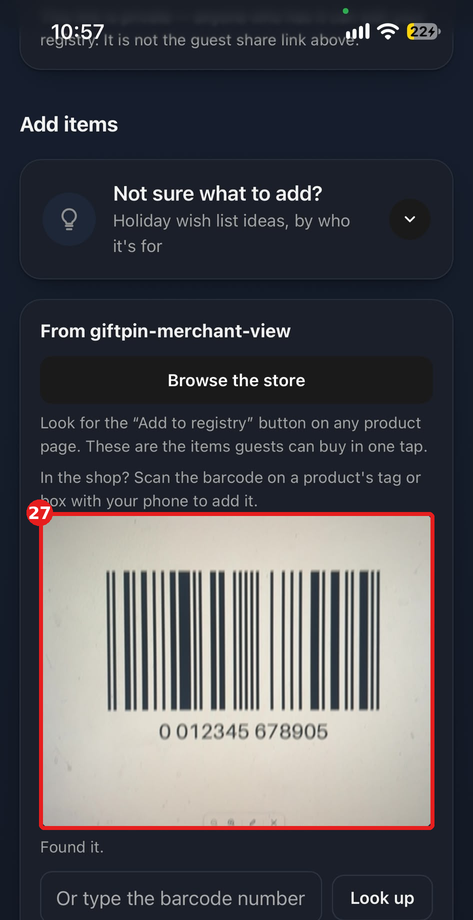
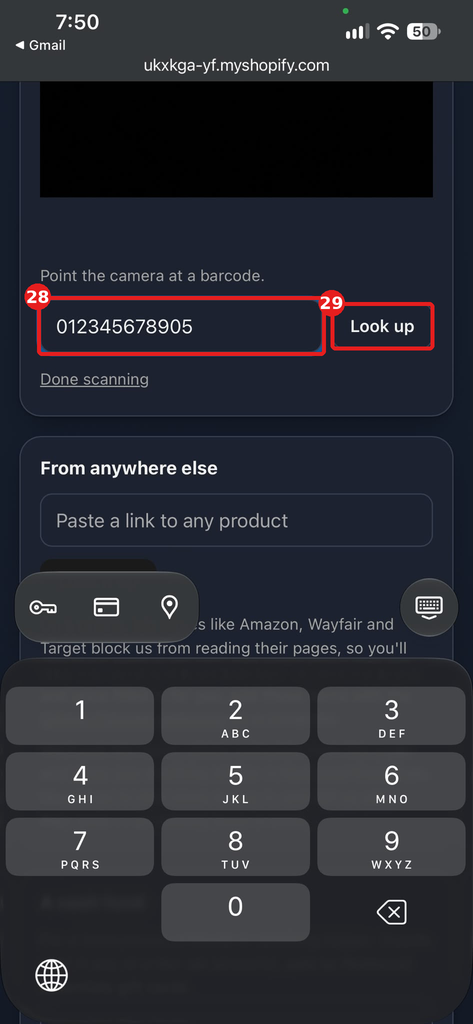
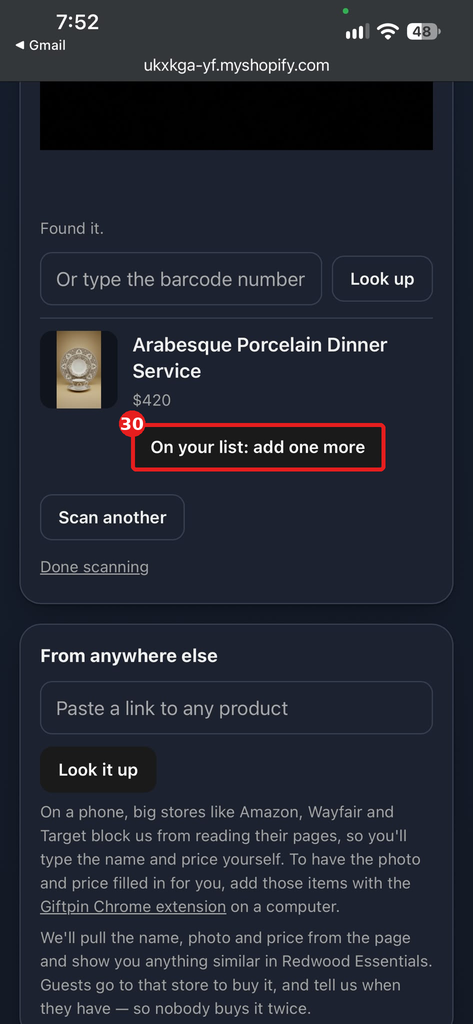
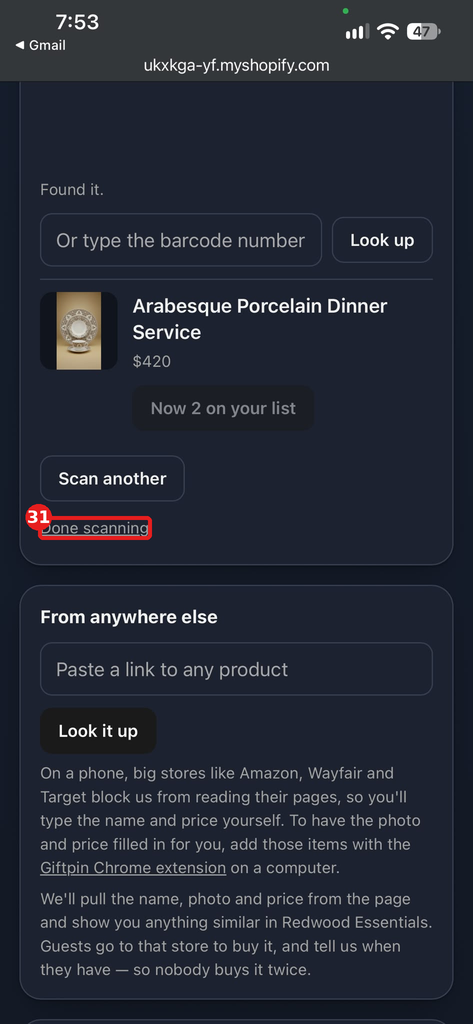
  3. Registrants can also scan a product's barcode with their phone in your shop to add it: they open Scan a barcode in the store on their manage page. This needs barcodes (or SKUs) on your products, and it works best with a clear, full-frame view of one barcode.
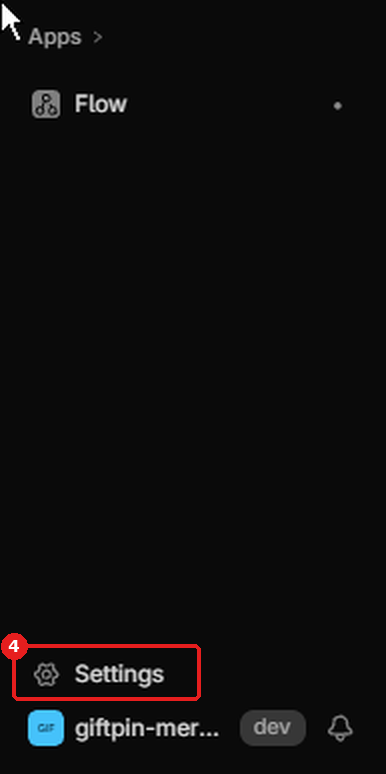
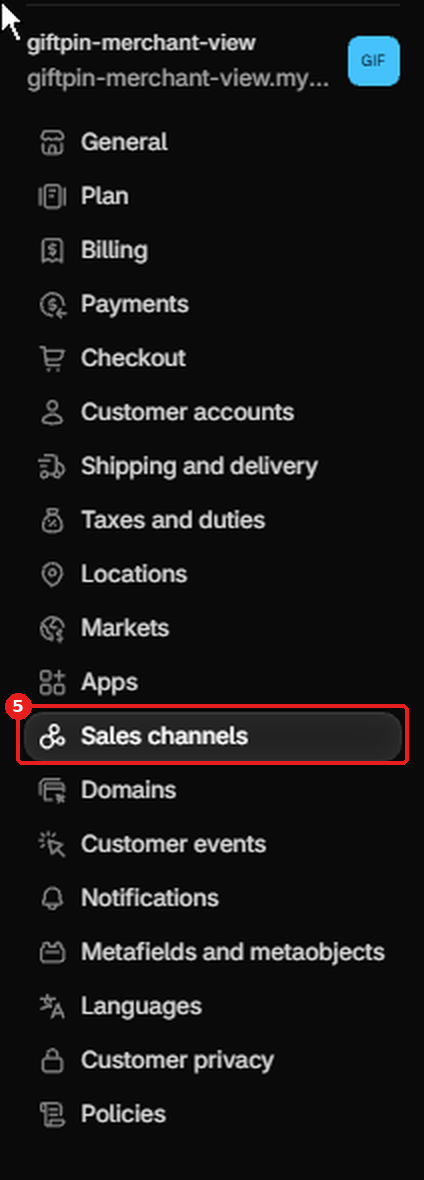
Shopify admin's left menu with Apps boxed in red and numbered 1, and an arrow to the Apps list where Giftpin Gift Registry is boxed and numbered 2Shopify admin's left menu with Giftpin Gift Registry, under Apps, boxed in red and numbered 1, and Giftpin's own menu open below it: Overview, Registries, Promotions, Analytics, In-store, Settings and PlanGiftpin's menu under Apps in the Shopify admin with In-store boxed in red and numbered 1The In-store page, with the Find a registry search box boxed in red and numbered 2 and the Create registry button boxed and numbered 3Shopify admin: “Settings” boxed in red and numbered 4Shopify admin: “Sales channels” boxed in red and numbered 5Shopify admin: “Back arrow next to Settings” boxed in red and numbered 6Shopify admin: “Products” boxed in red and numbered 7Shopify admin: “Product name” boxed in red and numbered 8Shopify admin: “Publishing adjust icon” boxed in red and numbered 9Shopify admin: “Point of Sale” boxed in red and numbered 10; “Done” boxed in red and numbered 11Shopify admin: “Save” boxed in red and numbered 12Shopify admin: “Point of Sale” boxed in red and numbered 13Shopify admin: “Edit Point of Sale” boxed in red and numbered 14Shopify admin: “Add tile” boxed in red and numbered 15; “Apps” boxed in red and numbered 16; “Giftpin Gift Registry” boxed in red and numbered 17Shopify POS home screen with the Giftpin tile, “Find or start a gift registry for a customer at the counter”, boxed in red and numbered 18Shopify POS on a phone: “Search box” boxed in red and numbered 19; “Maya's Christmas list” boxed in red and numbered 20; “Start a registry for a customer” boxed in red and numbered 21Shopify admin: “Products” boxed in red and numbered 22Shopify admin: “Product name” boxed in red and numbered 23Shopify admin: “Barcodes” boxed in red and numbered 24Shopify admin: “Barcode” boxed in red and numbered 25Shopify admin: “Save” boxed in red and numbered 26Registry manage page on a phone: the open camera pointed at a barcode, boxed in red and numbered 27Registry manage page on a phone: “Barcode number” boxed in red and numbered 28; “Look up” boxed in red and numbered 29Registry manage page on a phone: “On your list: add one more” boxed in red and numbered 30Registry manage page on a phone: “Done scanning” boxed in red and numbered 31
20

Shopify Flow (Pro)

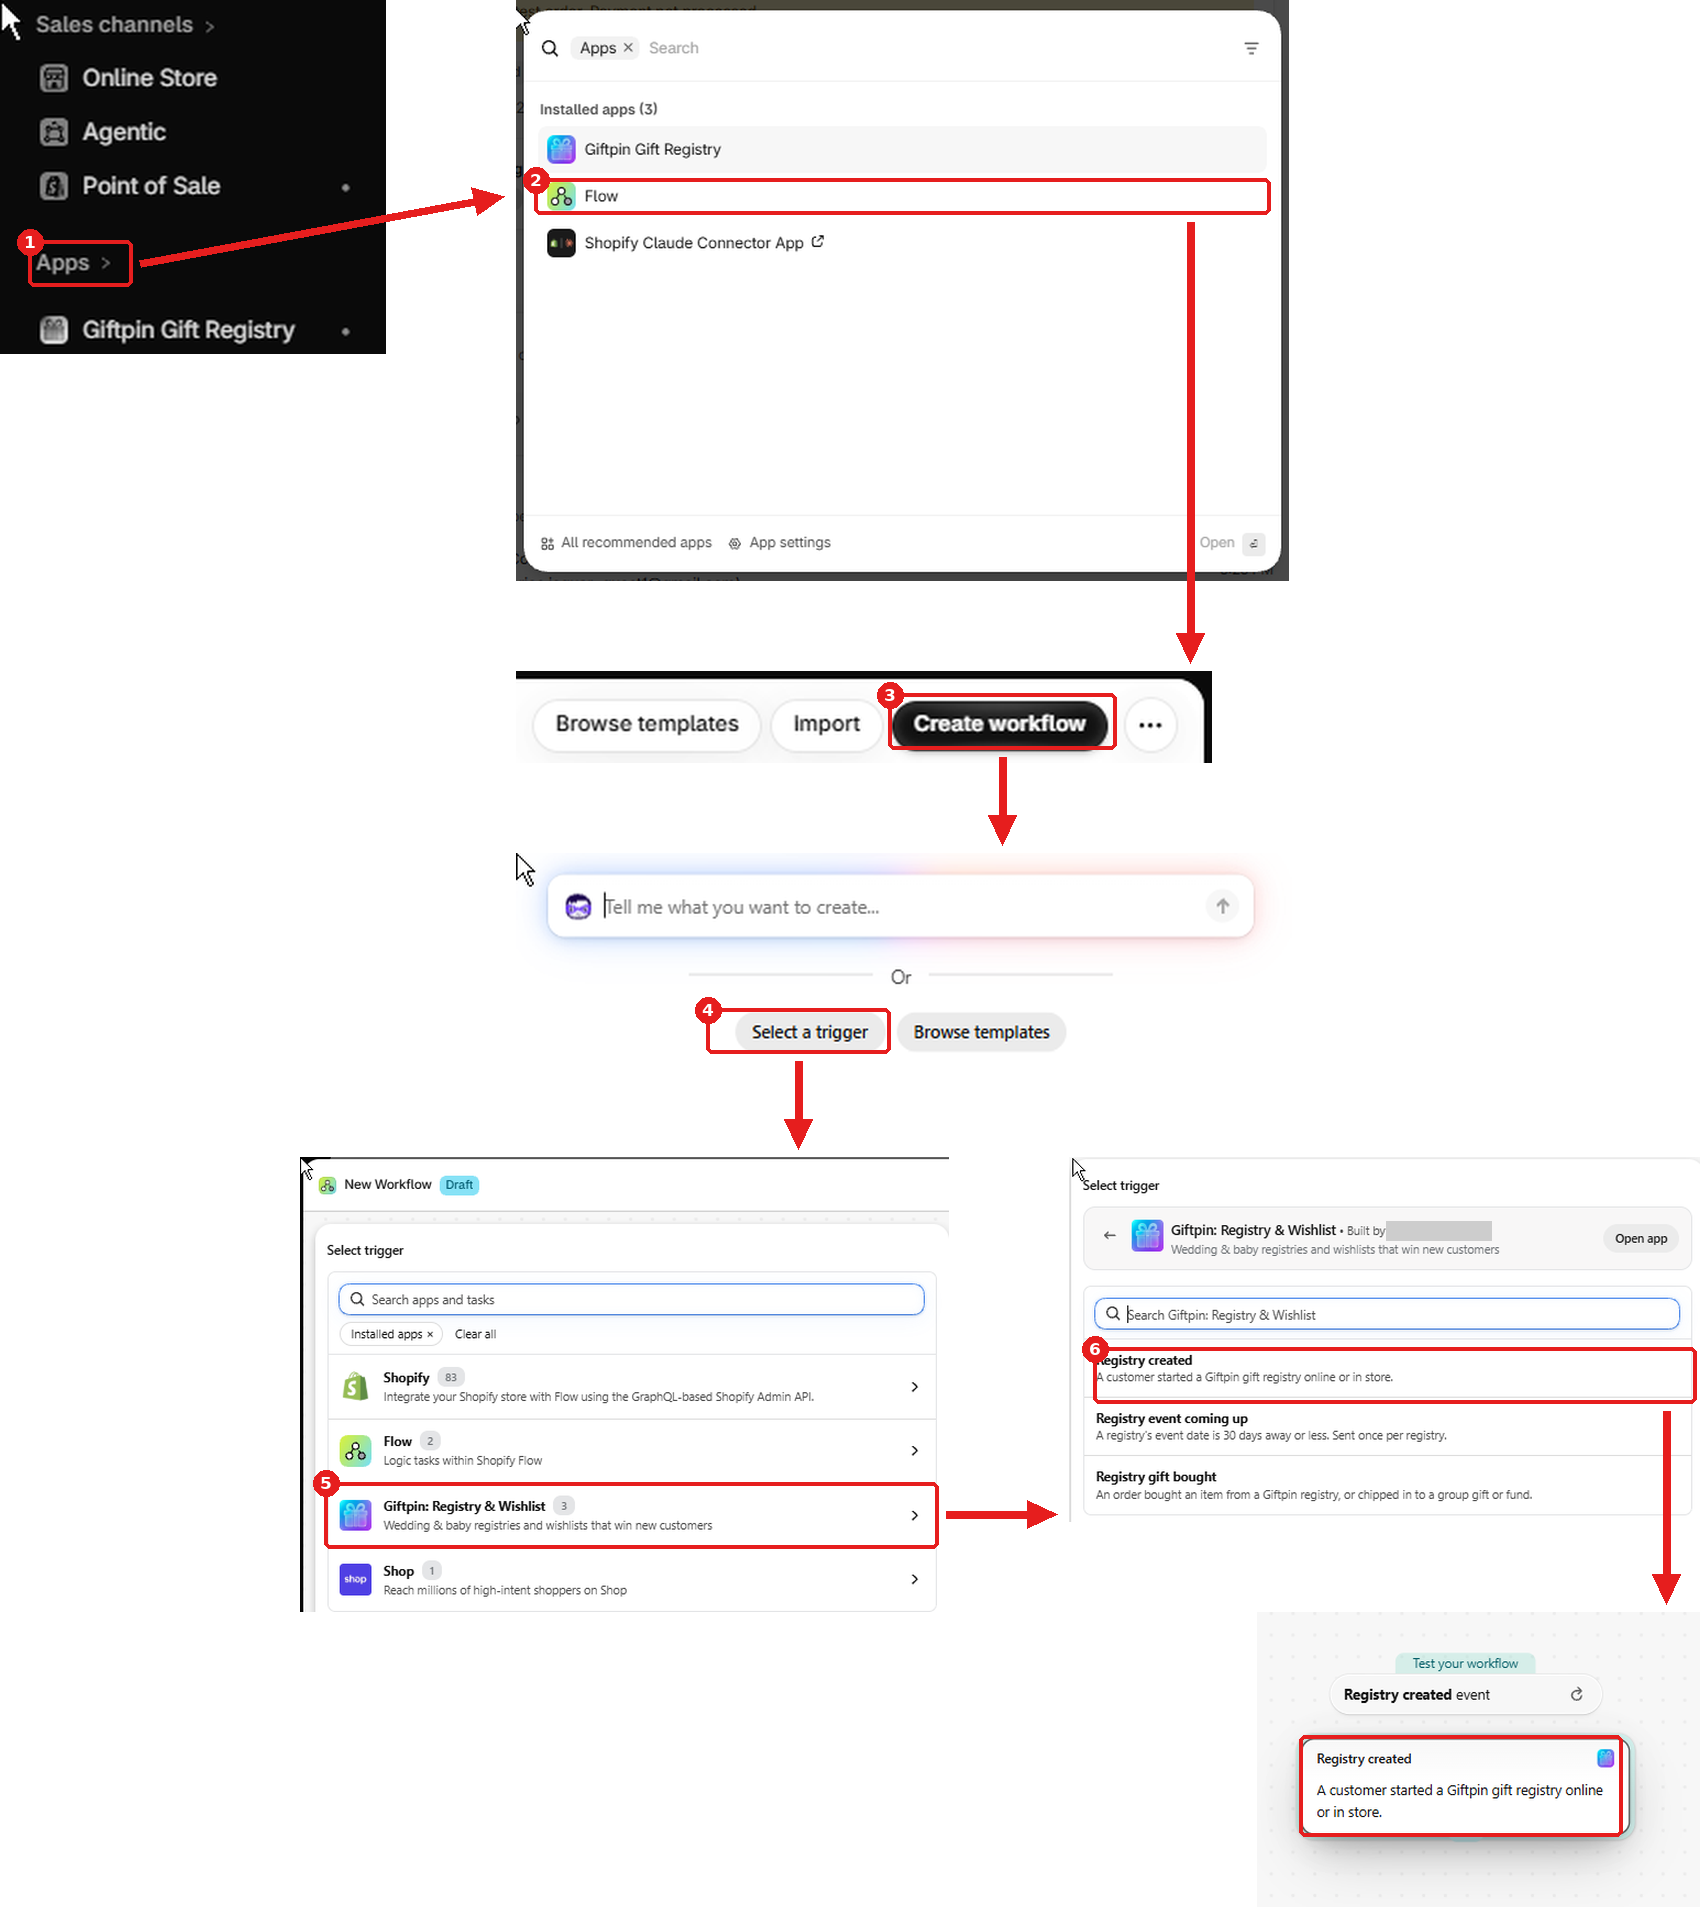
  1. To use them, open Apps → Flow in your Shopify admin, click Create workflow, then Select a trigger. In the list, pick the app Giftpin: Registry & Wishlist first and its three triggers appear. Searching for "Giftpin" or "registry" in the main list finds nothing: choose the app first.
  2. Giftpin adds three triggers to Shopify Flow: Registry created, Registry event coming up and Registry gift bought. Use them to email the registrant, tag a customer or tell your team.
  3. Registrant emails are for messages about their own registry. Marketing to them still needs their consent.
Shopify admin steps to a Flow trigger: Apps boxed and numbered 1, an arrow to the Apps list with Flow boxed and numbered 2, the Workflows page with Create workflow numbered 3, Select a trigger numbered 4, the Giftpin: Registry & Wishlist app numbered 5, and its three triggers with Registry created numbered 6 and added to the workflow. The developer's name is covered

Ready to give your customers a registry?

Free to install from the Shopify App Store.